0%

The method for printing barcodes in Laravel is to use the Zebra ZPL. The Zebra ZPL is a standard for printing barcodes, you can simplely treat it as that you manually build some plain text and send it to the printer via socket.

Zebra ZPL

You can easily design your barcode by this online editor
http://staging.advanced-technology-group.com/

Or you can download a free tool to design your barcode, personal recommend this method
https://zpldesigner.com/

after that just copy your zpl code and treat it as your barcode template, later just replace the barcode data with your own data in code.

Sample code of Zebra ZPL

1
2
3
4
5
6
^XA
^CF0,100
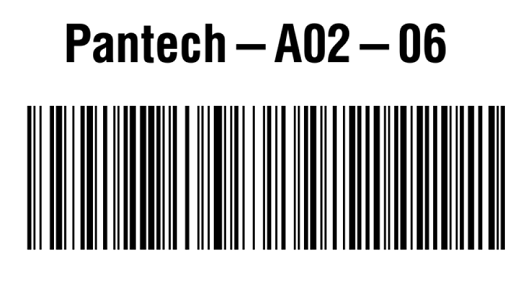
^FO220,50^FDPantech-A02-06^FS
^BY4,3,70
^FO150,210^BCN,280,N^FDSLF-Pantech-A02-06^FS
^XZ

the printed out barcode is like this

Read more »

If you have a large .pst or .ost file, you may experience application pauses while you perform typical operations in Outlook. These typical operations include reading email messages, moving email messages, and deleting email messages.

The following list summarizes expected behavior based on the size of your Outlook data file.

Up to 5 GB:

This file size should provide a good user experience on most hardware.

Between 5 GB and 10 GB:

This file size is typically hardware-dependent. Therefore, if you have a fast hard disk and lots of RAM, your experience will be better. However, slower hard disk drives, such as drives that are typically found on portable computers or early-generation solid-state drives (SSDs), experience some application pauses when the drives respond.

More than 10 GB:

When the .ost file reaches this size, short pauses begin to occur on most hardware.

Very large (25 GB or larger):

An .ost file of this size increases the frequency of short pauses, especially while you are downloading new email messages. However, you can use Send/Receive groups to manually sync your mail.

REF:
https://docs.microsoft.com/en-US/outlook/troubleshoot/performance/application-pauses-if-you-have-large-data-file

About this starter kit

This kit is a scaffolding basic that you can start your project with.

Installation

  • Open terminal and clone the repo :
    1
    git clone https://github.com/jichiduo/laravel8_livewire2_bootstrap4_starter.git 
  • Go to the project directory and copy the env.example as .env file
  • Update the .env file as you need. Especially the database config
  • Run composer install
  • Run npm install && npm run dev
  • Run php artisan migrate:fresh --seed
  • The default username/password is [email protected]/password
  • Run php artisan key:generate
  • Run php artisan serve
  • Open the browser and type http://localhost:8000

Global Toastr Notifications

System provide a global toastr notifications system. You can use it to show success, error, warning, info, and others.
At the bottom of the app.blade.php file, you can find the following code to show a success message:

1
2
3
4
5
<script>
window.addEventListener('toastr', event => {
toastr.success(event.detail.message);
});
</script>

In the liveware componet class you can use the following code to dispatch an event to show a success message:

1
$this->dispatchBrowserEvent('toastr', ['message' => 'User successfully updated.']);

License

This kit is open-sourced software licensed under the MIT license.


If you run your website on a private linux server, you can push your website to the repo by the following steps:
The example below is for a Centos7 x64 Linux server.

Install Git

Install git

1
yum install git

Create user and repo

Create a git user and a bare git repo.

1
2
3
4
useradd git
passwd git
cd /home/git
git init --bare hexo.git

Change owner

change the owner and group of the repo to git.

1
chown -R git:git hexo.git

Generate SSH key

get local machine SSH public key , for windows , just open your powershell and type the following command:

1
cat ~/.ssh/id_rsa.pub

copy this key to the clipboard.

if you can not find id_rsa.pub file from the folder , you may run this to generate the local key

1
ssh-keygen -b 4096 -t RSA
Read more »

Make sure your Hexo and Next theme are up to date.

Step 1:

open the {HEXO_ROOT}\themes\next\_config.yml file and find the following code:

1
2
custom_file_path:
#head: source/_data/head.swig

remove the # from the “#head: source/_data/head.swig” line.

Step 2:

create a file {HEXO_ROOT}\source\_data\head.swig and put the GA code in this file:

1
2
3
4
5
6
7
8
9
<!-- Global site tag (gtag.js) - Google Analytics -->
<script async src="https://www.googletagmanager.com/gtag/js?id=G-XXXXXXXXXX"></script>
<script>
window.dataLayer = window.dataLayer || [];
function gtag(){dataLayer.push(arguments);}
gtag('js', new Date());

gtag('config', 'G-XXXXXXXXXX');
</script>

Step 3:

rebuild your site

1
2
3
hexo clean
hexo g
hexo s